How to Edit My Uploaded Youtube Video
There are times where you've uploaded a YouTube video and racked a small-scale number of views, only to find you've made a glaring mistake. If you fix the upshot on your reckoner and then upload a new video, y'all'll lose the views your YouTube post has made.
But does it really have to be that way? Luckily, you could make minor video fixes correct on the video hosting platform. Here's what you can practice to fix minor video errors without losing the view count.
Cutting Out Errors in YouTube Videos
YouTube doesn't want creators to make meaning changes to videos they've already uploaded, specially if it already has views. That's because uploading a new video that volition supercede an existing 1 while keeping the previous video's properties can mislead viewers and YouTube's algorithm.
Nevertheless, the platform knows that creators sometimes make pocket-sized honest mistakes, or someone featured in the uploaded video may demand that they be removed from it. So, to grant that, creators can cut out scenes from their video without resetting a video'south metrics.
How to Trim the First or End of a YouTube Video
You beginning have to sign in to your YouTube Studio account to edit your video. Then, follow these simple instructions:
- In one case you're on the Channel Dashboard, click on Content in the left menu.
- You'll encounter all the videos yous've uploaded on the Channel content page. Click on the thumbnail of the video yous want to edit.
- Now, you'll run across the Video details folio. Choose Editor from the left pane.
- You lot'll now access the Video editor window. Here, click on Trim, and a blue box will then announced in the timeline section of the window.
- Drag both ends of the blue box to cut out sections of the start or stop of your video—only the part of your video inside the box will remain uploaded.
- Once yous're happy with the trim, click on Preview at the bottom of the screen to see what the last edited video will look like.
To confirm the changes you fabricated, click on Relieve at the upper right-hand corner, correct to a higher place your video'south preview window.
How to Trim a Section of Your YouTube Video
If you want to remove the middle part of your video, the procedure is about similar. Here'due south what you need to practice:
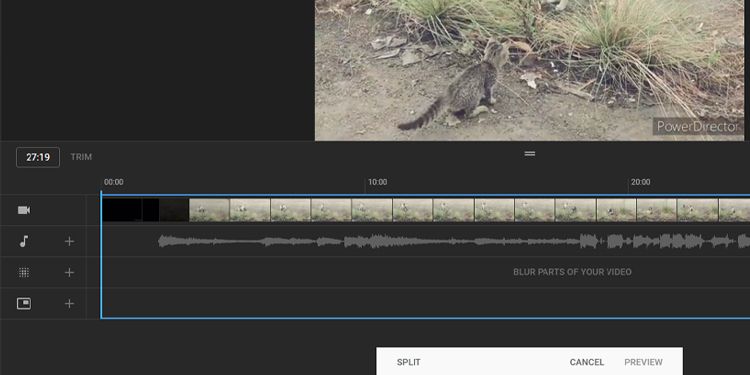
- First, click on Trim. A blue box will appear again in the timeline section of the window.
- At present, instead of dragging the ends of the box, click at the kickoff of the section you desire to remove in the timeline.
- Alternatively, you lot can coil your mouse at the time stamps right higher up the blue box or insert the exact seconds and frame number right in the Timestamp field beside the Trim button.
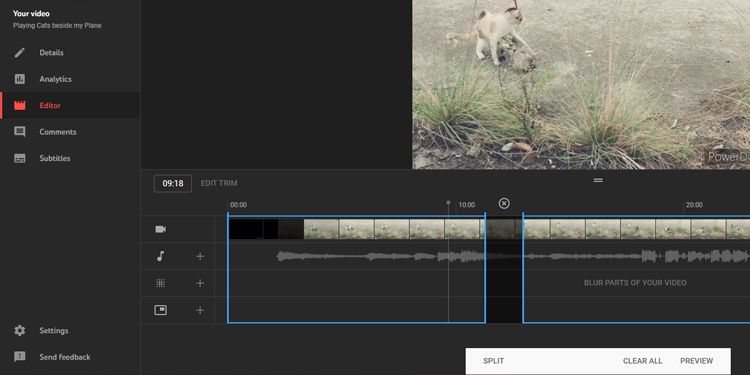
- Once you're certain of the starting point of your cut, click on Split at the lesser of the screen.
- A bluish bar should appear right at the spot where you set up the showtime of the trim. Elevate the bar to the desired end of the department yous want to cut.
Now, just like before, click on Preview to watch the last event and and then click on Save to update your changes on YouTube.
How to Undo Trims in YouTube Studio
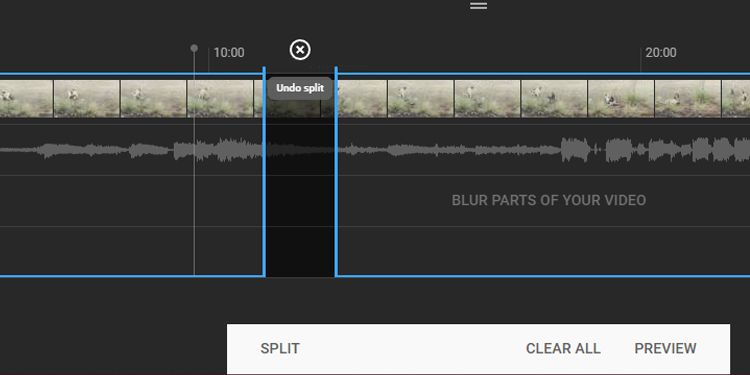
When you lot want to undo the trims you've fabricated at the start or end of your video, simply drag the blue box to its previous position. Just if yous want to remove the trim you've fabricated in the center of the video, you need to click on the X marker right higher up the section you're about to discard.
If you want to undo all changes you made, click on Clear All at the bottom of the screen. Or, if you've already hit Preview, choose Discard Changes instead of Relieve. You lot can also hit the three-dots icon beside Save and click on Revert to original to cancel all unsaved changes.
Blurring Parts of Your YouTube Video
In case someone reaches out to you and wants to be removed from your video, but they're in a crucial section that you lot can't modify, and then you lot can mistiness their face or parts of your video instead. To do so, you'll need to select the video similar earlier and access the Video editor department in YouTube Studio.
Blurring Faces Automatically in YouTube Studio
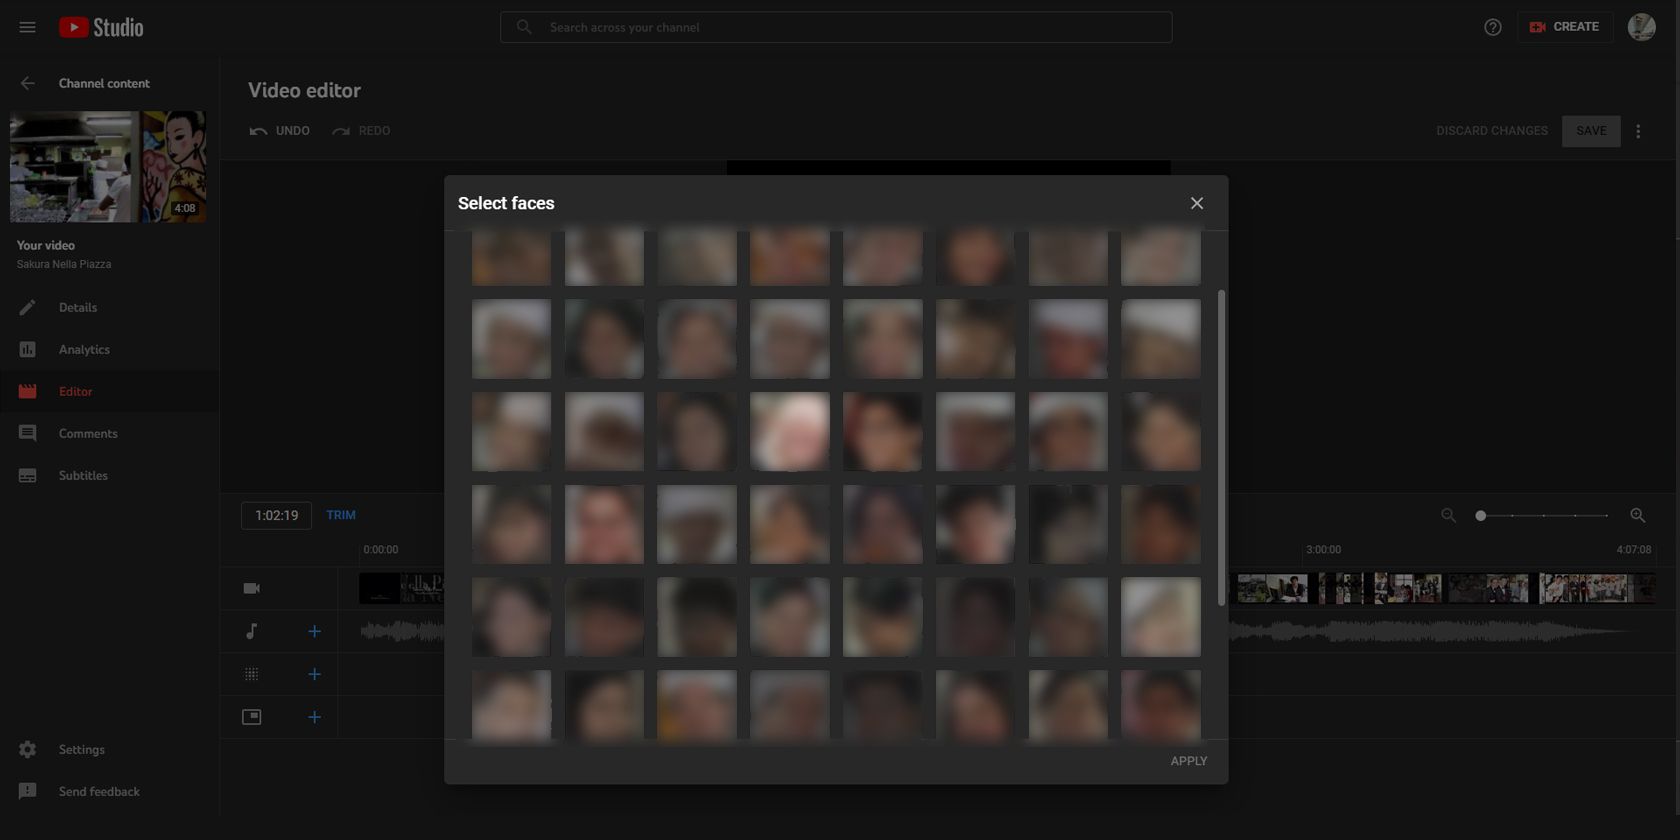
Click on Blur parts of your video in the timeline department, so choose Face blur. YouTube will then automatically process your video, looking for unique faces. One time the process is complete, you can pick the face y'all desire to mistiness and click Apply.
You lot tin can change the time frame the mistiness effect applies past manually changing its start and stop timestamps. You can also manually adjust its size so that the blur fits exactly over the face y'all want to hide.
Once yous're satisfied with the outcome, click on Salvage. Merely if you lot want to remove the blur effect instead, click on the Trash icon right beside the timestamps, or choose Discard changes to cancel all effects.
Applying Manual Blur to Your YouTube Video

Sometimes, YouTube may fail to detect the face you want to blur automatically, or you may want to blur a non-face detail (like a vehicle plate number). In such cases, you'll have to do it yourself. This is slightly tricky, so follow the steps carefully:
- Click on Blur parts of your video from the timeline, but choose Custom blur this time.
- You should come across Custom blur options right abreast the video preview window. You can pick between two blur shapes: Rectangle or Oval. Select your preferred shape.
- You can likewise choose between two mistiness behaviors: Rail object or Fix blur position. Track object automatically adjusts the blur to follow the item you blocked, while fix blur position keeps the blurred expanse static throughout. Determine what you want to move on to the next step.
- Now, adjust the mistiness position in the video preview window to encompass what yous want to hide.
- If necessary, add additional blurred sections by clicking and dragging on the parts you wish to block. You tin besides modify its duration by altering its start and finish timestamp.
In one case you lot're satisfied with the placement of your custom mistiness, click on Salve. Otherwise, click on the Trash icon to remove the blur effect.
Limitations to Post-Upload Editing on YouTube
While you can add mistiness effects to your videos anytime, all other effects accept limitations. In one case your videos attain over 100,000 views, you cannot salvage changes you brand to them. However, this restriction does non apply if you're a office of the YouTube Partner Program.
Make Adjustments Without Losing YouTube Views
YouTube Studio is a swell tool for keeping runway of your videos, playlists, and more. You can even track how your channel and each video perform through analytics.
And although the YouTube Editor is a pretty bones tool compared to other video editing software, the ability to brand minor changes to your video after you upload is a lifesaver for many creators.
About The Author

Source: https://www.makeuseof.com/edit-youtube-videos-without-losing-views/
0 Response to "How to Edit My Uploaded Youtube Video"
Kommentar veröffentlichen